Sell Gift Cards with FoxyShop
Our gift card feature lets you sell gift cards on your FoxyShop site, and when ordered, automatically creates the card code and emails it to the gift recipient. Here’s how to set it up.
How Gift Cards Work
Gift cards are similar to coupons in a few ways. Just as a “coupon” in Foxy defines the coupon itself, and the “coupon code” is the important bit that’s entered by the customer, gift cards similarly have “gift card codes” that are the individual resource the customer enters onto the checkout. Unlike coupon codes, however, gift card codes can have balances, allowing them to be reused until the balance is reduced to zero. Also, unlike coupon codes, gift cards will apply to shipping costs.
Though Foxy provides a number of ways to restrict and limit gift cards, most merchants will not use any restrictions. Further, though Foxy allows setting expiration dates, “normal” gift cards in most countries/states/provinces/regions cannot legally be expired. If you plan on using some of the functionality allowing you to restrict gift cards, be sure to check the laws for the locations you sell into.
Selling & Automatically Provisioning Gift Cards with FoxyShop
Gift Cards are created in our newer admin at https://admin.foxy.io. This admin has all the menu options needed to set it up. You can use your legacy admin credentials on the newer admin.
Note for API users: You can also do the setup with the API, but instructions for that will not be covered here. Please see our gift cards article in the regular Foxy wiki for API request details and our API documentation.
Provisioning the gift card
When setting up the product, you can use an existing category for your gift card or create a new category. You’ll need to pass this category with the add-to-cart, and when this product is purchased, Foxy will use the email template that you set up to notify the gift recipient at the specified gift recipient email address with a newly-generated gift card code.
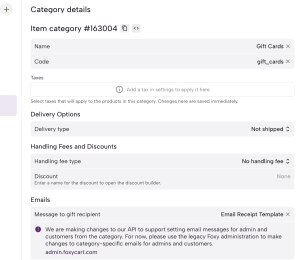
To create a new gift card category, you can do this in the newer admin at https://admin.foxy.io. Check to make sure that your settings for the Delivery Options and Emails are set up as in the screenshot below. You can opt to not send an email to the recipient, but you should make sure that you know for sure that you don’t want to send it.
Next, you’ll create the gift card in the admin at admin.foxy.io. Once that’s completed, you can enable it as a “product” that can be purchased by your customers, and delivered (via email) to a gift recipient. To enable using the admin, you’ll set up the provisioning section:
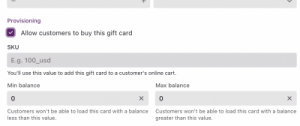
The Allow customers to buy this gift card option can be set to unchecked to disallow new gift cards from being purchased by customers. The Min and Max balance values allow you to set minimum and maximum values for gift cards that are added to the cart, to prevent values outside of a desired range.
Creating the gift card product
You will create a gift card add-to-cart within FoxyShop using the following as a guideline:

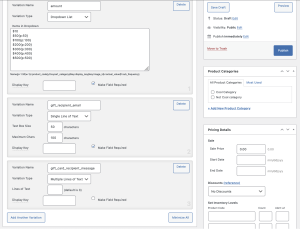
name, price, gift_recipient_email, category for the gift card, and code should all be required. The code should match gift_card_ plus the sku from the gift card. So, if you gave the gift card a sku of widgets as in the example above, the code would be gift_card_widgets.
- The matching code in the example screenshot will result in the product showing in the cart with a product name of “Gift Card”.
- The gift_recipient_email submitted by the customer must be a valid email address. If you’re using the DEFAULT category for your gift card email, you don’t need to pass a category.
- Optionally, you can use a variant of gift_recipient_message to show on the default gift card email to the gift recipient.
For tips on customizing the gift card email, you can see our article below. Note that this is advanced:
Customizing the Gift Card Email
Notes & Considerations
Gift Card UI
Gift cards can only be viewed, created, modified, etc., via the new Foxy admin at admin.foxy.io, or via the API. Support will not be added to the old admin.
How Gift Cards are Attached to Customers
When a customer uses a gift card code (or on creation, if desired) and does not check out as a guest, that gift card code will be attached to the customer record. After that point, only that customer will be able to use the gift card code at checkout. If a different customer attempts to use that gift card code, the customer will see an error.
Note also that gift card codes can be attached to customers via the API.
Gift card codes that are attached to a customer will automatically be applied when that customer logs in on the checkout.
Coming soon: Customers will be able to attach a gift card to their customer account from the customer portal.
Accounting Considerations for Cash v. Accrual Based Bookkeeping
Before you start selling gift cards, you’ll likely want to chat with your accountant to ensure you’re not setting yourself up for headaches. If you sell a $100 gift card, you get $100 now, but you’ll generally also have a $100 liability to account for. Just make sure you know what you’re getting into so you can avoid problems.
Multiple Currencies
A gift card in one currency cannot be used if the cart is in a different currency.
Gift Cards & Subscriptions
If a gift card is applied to a subscription, the gift card will continue to apply to the subscription until its balance has been completed used up. The gift card will remain attached to the subscription, but will just not apply any discount. This means that if further balance is added to the gift card, it would start applying additional discounts to the subscription at the next renewal.
Note that even if the gift card reduces the cost of the subscription to $0, the customer will still need to provide a payment method on the checkout. Then, once the gift card balance is exhausted, the customers saved payment method will begin being charged for the subscription renewal.
Taxes, Shipping, and Product Restrictions
If you set a product or category restriction on the gift card, but the transaction contains items that are not covered by the discount, taxes and shipping will still be discounted using the gift card balance.
For instance, let’s say you have a $30 Shirt and $30 Pants in the cart, $6 taxes, and $10 shipping. The customer applies a $100 gift card that only applies to Shirts. The discount applied would be $46.
If you have a use case where this causes a problem and where coupons wouldn’t make more sense, please do reach out to let us know about it.
FoxyShop 4.7: Image Upload Update
Before upgrading, please read this carefully.
TL;DR if you allow customer uploads on your cart or have a datepicker calendar, you’ll need to add a new plugin before upgrading.
WordPress temporarily blocked access to FoxyShop from their plugin repo this week due to the fact that FoxyShop uses the flash plugin Uploadify to process our image uploads. When I first built FoxyShop, Uploadify was a great tool that was widely used, but since that time it has garnered a bad reputation as being insecure. I want to stress that our implementation of Uploadify is completely secure since we don’t use their image processing tool but use WordPress’ instead. We have the upload process fully locked down. That said, WordPress asked us to stop using Uploadify and disabled FoxyShop from the repo until we did so. I understand what they are doing and why, but it’s still a bit frustrating.
FoxyShop uses Uploadify in two places — the product upload within the product detail page and the customer upload tool (as a product variation). I have rebuilt the image upload tool using Dropzone which will allow you to upload images by dragging and dropping.
If your cart allows customers to upload images as part of their order, you will need to add a supplemental plugin called “foxyshop-uploadify” (download here). This adds the uploadify files back to WordPress and provides the theme files necessary to keep all the functionality that you’ve been using. If you have a foxyshop-custom-upload.php file in your plugin you’ll want to update the file references based on the ones that you’ll get in the foxyshop-uploadify plugin found above.
We also were alerted by the WordPress plugins team that the jQueryUI Datepicker widget is now bundled directly with WordPress. As a result, we have switched our include method to load the Datepicker directly from the WordPress files. There may be a few of you who were relying on the Datepicker files in the FoxyShop plugin. If that’s the case, you’ll want to download the files directly form jQuery UI and include them directly in your theme.
If you are confused about any of this, please write in. I’m happy to help answer any questions or help you get your site functionality upgraded. Thanks!
Other updates in 4.7:
- Update sub start and end dates to listen for FoxyCart date format (like 1m, 10d, etc.)
- Don’t load multiship JavaScript if multiship is not enabled
And other updates in the 4.6.x versions:
- WP 4.3 compatibility changes with widget constructor
- SSO endpoint now listens for update/cancellation and doesn’t query cart in those cases
- Update PrettyPhoto to 3.1.6
- Update Order Desk Link on Orders page
- Removing unneeded queries when setting up images
Reverse SSO: Logging Into Your Site After Checkout
 If you are asking the FoxyShop datafeed endpoint to create user accounts on your site, you can customize the receipt to automatically log the user in to your WordPress site. This means that by the time they get back to your site their account will already have been created and they will be logged in. In order to utilize this feature, please see the following requirements:
- Must be using FoxyCart 2.0+
- Must be using FoxyShop 4.6+
- Must have SSO enabled
- The datafeed should be pointed to FoxyShop
- “Create/Update WordPress User After Checkout” should be checked in FoxyShop Settings
FoxyShop 4.6: Expiration and Reverse Login
 FoxyShop 4.6 includes product expiration features and the ability to provide automatic login at your site after checkout.
Here’s the list of the new features and fixes in this release:
- Adding product expiration feature – use a number (minutes) or a date (Y-m-d in Pacific time) when setting up your products to handle time-sensitive products.
- Adding Reverse SSO functionality – log your customers into WordPress after checkout. See this link for setup instructions.
- Connecting featured images that weren’t uploaded to the product
- A custom image size called “featured” won’t take over the featured image functionality any more
- Fix to make sure that hidden required checkboxes aren’t required
- Adding filters to disable custom category sorting and provide your own custom sorting
Supporting Wholesale Users
There are a few different ways to support wholesale users with FoxyShop. The simplest is to have a separate batch of products that your wholesale users can order. In order to support this, I’ve put together an add-on plugin for FoxyShop which you can download here. Just download this file and put it in wp-content/plugins. Then you can can go into WordPress and enable it.
This plugin requires the Advanced Custom Fields plugin (the free version is fine). Once this is installed, you’ll be able to edit your products and categories and set them with access restrictions. Then you can create your wholesale users and assign them to the Wholesale role.
You may also want to consider installing the Peter’s Login Redirect plugin to control where your wholesale visitors are sent after login.
I recommend putting this in your single product template:
//Check Access
if (get_field("access_restriction") == "wholesale" && !check_user_role(array("wholesale", "administrator"))) {
die("Please login before accessing this product.");
}
$product_categories = wp_get_post_terms($product['id'], 'foxyshop_categories', array("fields" => "all"));
if ($product_categories && !is_user_logged_in()) {
foreach ($product_categories as $term) {
$access_restriction = get_field("access", $term->taxonomy . "_" . $term->term_id);
if ($access_restriction == "wholesale") {
die("Please login before accessing this product.");
}
}
}
And this in your in your single category template (around line 25):
//Check Wholesale Access Restriction
$access_restriction = get_field("access", $term->taxonomy . "_" . $term->term_id);
if ($access_restriction == "wholesale" && !is_user_logged_in()) {
die("Please login before accessing this section.");
}
Adding these bits of code will further secure the wholesale categories and products from prying eyes.
Upgrading to FoxyCart 2.0
It seems like FoxyCart has been working on version 2.0 forever — well it almost has been forever. But their hard work has paid off and it’s almost ready for release. It’s been in public beta for a couple of months and it is now solid enough to install on most sites. In this post, I’ll describe some key features and some of the things that you’ll want to look out for when upgrading.
Before You Start
2.0 is still in beta. It’s getting very solid, but you may encounter some rough edges so be aware of that. If you do run into issues, you will want to email FoxyCart support.
Once you upgrade, you can’t go back to 1.1. So either create a test store, or be sure you really want to do this. When upgrading, keep in mind that your old templates will be blown away so if you had custom scripts, those should be safely downloaded first. If you have custom wording in your email template, be sure to save it first.
I recommend using FoxyCart’s default responsive checkout. It looks very nice and modern and is fully mobile-friendly. If you still want to skin the checkout to match your header and footer and fonts/colors, you’ll definitely want a test store so you can spend some time playing with it.
Prepare a file with your site’s logo. It should be wider than it is tall and 280px wide. Bonus points if it’s a transparent PNG. Upload this to your site and keep the url handy.
Upgrade FoxyShop to at least version 4.5.
Does your store use Colorbox for gallery image popups? If so, you will want to be ready to either switch to PrettyPhoto or load the ColorBox files on the site yourself. The new version of FoxyCart does not use ColorBox but instead a brand new modal overlay that has been custom-developed by FoxyCart called Sidecart.
The FoxyCart 2.0 documentation is available here: https://wiki.foxycart.com/v/2.0/start. Pay special attention to the changes in the templating and cart js sections. If you had old code that worked with the fcc object or with ColorBox it won’t work any longer.
Taking the Plunge: Upgrading
In the FoxyCart admin on your Store Settings page, put your new image logo in the “Logo URL” box and upgrade to 2.0. Then go to the FoxyShop settings and update your store to be FoxyCart Version 2.0. Now, go to your site and try to add something to the cart. Does Sidecart pop up? If not, open up your console and look for Javascript errors. You’ll also want to look at your FoxyCart includes and make sure they are pulling down the correct Sidecart includes and responsive_styles.css.
Go back to the FoxyCart admin and click on the new “Configuration” menu item under the templates section. Most of this is very self-explanatory. I do recommend clicking on “Customize Cart Display” and unchecking all but the first “Show Product Options.” You may also be interested in customizing what checkout fields are shown and what countries are allowed to check out. This used to be a script but it’s now built-in.
There are new versions of the shipping scripts which are required. If you need these and can’t find them in the wiki, contact FoxyCart support. If you want to add special fields to the checkout, the code can be entered right in the injection section.
Version 4.5: FoxyCart 2.0 Support
 It’s been quite a while since I’ve released a new version of FoxyShop, but I’ve been storing up some incremental improvements. Version 4.5 has a number of upgrades and features.
FoxyCart 2.0: This new release supports the features and functionality found in FoxyCart 2.0 which is nearing public release. This means that you can select 2.0 from the FoxyCart Version dropdown and the proper includes will be bundled. If you are interested in upgrading to 2.0, please read this post.
Bundled Products: FoxyCart 2.0 supports bundled products and so if you are using 2.0, FoxyShop will now support bundles as well – letting you lock products to their parent products.
Step-by-Step Guide for Nonprofits
This is the moment you’ve been waiting for. Setting up your own donation page!
Within the FoxyShop plugin, click on Add New Product. Set the base price to 0 and remove the quantity and weight fields.
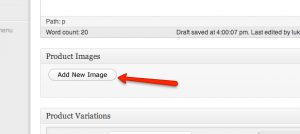
You’ll also want to add an image for your product.

The goal here is to get a super flexible donation page which will allow your constituents to pick a specific donation amount, specify a custom amount, and decide if they want to give a one-time gift or a recurring gift.
For this product, check the two checkboxes to “Force Immediate Checkout” and “Empty Cart Before Adding Product” as shown below since we won’t really need the modal cart functionality.
To get the donation page functionality we need, we’ll need to set up some specific product variations.
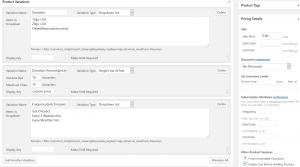
Create a product variation called “Donation” of variation type “Radio Buttons” with the following data:
$5{p:5}
$10{p:10}
$25{p:25}
$100{p:100}
Other{dkey:custom-price}
Next, create a “Single Line of Text” variant named “Donation Amount{price}” and set the “Display Key” to “custom-price”
Finally, create a “Drop Down List” variant named “Frequency{sub_frequency}” with these values:
Just Once{v:}
Every 2 Weeks{v:2w}
Every Month{v:1m}
Save the page. To add a link to this page in your menu, create a new page in WordPress of format “link” and point it to the url of your products.
If you’re using the Other donation amount, this setup will add the correct amount to the cart, but won’t dynamically update the price on the page. To do that, you’ll need to apply a script to the page, just before the closing </body> tag. You can grab the code here. If you need assistance on how to do this, contact us here.
Disclaimer
Version 4.4: FoxyCart Templates
 Version 4.4 includes a host of small updates, new filters, and jQuery 1.10.1 support. There’s also a few new features to help you build dynamic FoxyCart stores even faster.
Important jQuery Note: The jQuery team made a big change in the 1.9 branch, removing support for .live(). This breaks a lot of older plugins. If you are using FoxyCart 1.0 or previous, FoxyShop will attempt to use jQuery 1.8.3. If you are using FoxyCart 1.1 or newer, the latest 1.10.1 branch will be used instead. To override, you can either include jQuery yourself or set this in your wp-config.php file:
define('FOXYSHOP_JQUERY_VERSION','1.8.3');
Please test your site after upgrade to make sure everything is working as expected.
Here are the highlights of this FoxyShop release:
Version 4.3.2: Custom Variation Names
 Version 4.3.2 has an upgrade which will allow you a lot of flexibility with the variation field names. You can now customize the name of the fields and the value of each variation. This is very helpful if you’d like to use a variation to set the subscription frequency. Here’s an example of the new syntax:
Variation Name: Frequency{sub_frequency}
Just Once{v:}
Every 2 Weeks{v:2w}
Every Month{v:1m}