Step-by-Step Guide for Nonprofits
This is the moment you’ve been waiting for. Setting up your own donation page!
Within the FoxyShop plugin, click on Add New Product. Set the base price to 0 and remove the quantity and weight fields.
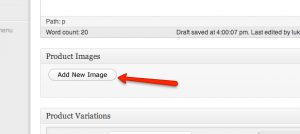
You’ll also want to add an image for your product.

The goal here is to get a super flexible donation page which will allow your constituents to pick a specific donation amount, specify a custom amount, and decide if they want to give a one-time gift or a recurring gift.
For this product, check the two checkboxes to “Force Immediate Checkout” and “Empty Cart Before Adding Product” as shown below since we won’t really need the modal cart functionality.
To get the donation page functionality we need, we’ll need to set up some specific product variations.
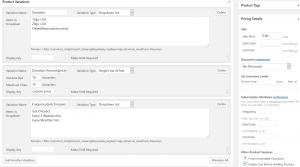
Create a product variation called “Donation” of variation type “Radio Buttons” with the following data:
$5{p:5}
$10{p:10}
$25{p:25}
$100{p:100}
Other{dkey:custom-price}
Next, create a “Single Line of Text” variant named “Donation Amount{price}” and set the “Display Key” to “custom-price”
Finally, create a “Drop Down List” variant named “Frequency{sub_frequency}” with these values:
Just Once{v:}
Every 2 Weeks{v:2w}
Every Month{v:1m}
Save the page. To add a link to this page in your menu, create a new page in WordPress of format “link” and point it to the url of your products.
If you’re using the Other donation amount, this setup will add the correct amount to the cart, but won’t dynamically update the price on the page. To do that, you’ll need to apply a script to the page, just before the closing </body> tag. You can grab the code here. If you need assistance on how to do this, contact us here.
Disclaimer
How To Build Custom Price Fields
Note: This page was updated on November 21, 2017. The previous approach outlined here is no longer necessary for creating a custom price field. Comments may refer to the previous article, but we are leaving here for future reference. If you have any questions, please contact us here.
Please see this article for instructions on how to create a field that allows a dropdown plus “Other” for custom donation entry.
Version 1.60: Inventory Management
 In version 1.60 you’ll find a new feature that lets you manage your inventory levels for all products. To set this up, check the “Management Inventory Levels” box on the settings page. You’ll get an endpoint URL which you need to load into your FoxyCart admin. In the FoxyCart advanced menu, check the Datafeed box and paste in your endpoint url. This is a randomized url for security. Now, when you are editing products you will be able to add product codes and set inventory levels for these codes. On the settings page you can set the master alert level (the number at which the user will be warned that there are only a few items left).
After an order is complete, FoxyCart sends the order details back to the store and the appropriate quantities are deducted from the product codes that were ordered. Here are a few notes for a successful implementation:
- If you are adding this feature to a customized theme, make sure you add the function foxyshop_inventory_management() to your single product template files. See the new template files for an example.
- By default, once a product reaches a quantity of 0, the customer won’t be able to order it any more. If you want to let them continue to order (backorder) products, you can do so by customizing your theme files and passing a “true” variable to the inventory management function. See the theme files for an example.
- You can also pass customized verbiage to the inventory management function as well. Or you can remove the language completely if you don’t want to alert the customer to a low inventory level.
- The inventory manager isn’t fool-proof. If the alert level is set at 3 and you have 8 products in stock, the customer could order 10 and the order would go through. If you are worried about this, you might want to set a higher alert level and remove the customer notice. This is in place because it seems to be a security risk to show all your inventory levels in the javascript source on the page.
Note added 4/18/2018: This is no longer an issue due to updates. See these links for inventory functionality updates:
https://foxy-shop.com/version-2-3-variation-inventory-update/
https://foxy-shop.com/version-3-8-inventory-and-api-updates/ - In case you were wondering, order codes are tied to variations as well so if you select a different variation which changes the product code, the message will change on-the-fly.
- Single products and one-level variations are supported. Each inventory item must have a unique product code. Remember that product codes can’t be added to a unique intersection of variations (for example: color Green, size Medium). So you have to keep your variations somewhat simplified.
Also in version 1.60:
- Product url added to the information sent to the cart (FoxyCart version 0.7.1 only)
- Price validation bug for bundled products corrected
- FoxyCart 0.7.0 include files updated to latest versions
Version 1.4: Improved Image Support
Version 1.4 of FoxyShop is out in the wild. Here’s a run-down of the new features and fixes:
New Feature: Improved Product Image Support with Dedicated Bar
The biggest new feature is that there’s now a dedicated image bar on the product page. Let’s face it, the default WordPress image management utility is clunky and takes a long time to load. This new image bar will let you load your images a lot faster. You can also set featured images, rename images, and even rearrange the order just by dragging.

The yellow box indicates the featured image. Click a star on another image to switch featured images. Click X to delete the image. Click the middle icon to rename the image. After clicking the rename button, enter the new name and press enter. If you change your mind, press escape. To rearrange the images, just click and drag the image to its new location. There’s no need to Update your product after making changes: all changes are saved instantly through the magic of AJAX.
New Feature: Product Sitemap Creation
If you check this new option on the settings page, FoxyShop will automatically create a product sitemap which you can submit to Google or any other search engine. If you are using categories, category pages will also be added to your sitemap. WordPress 3.1 is recommended so you get those awesome hierarchical url’s. The sitemap is recreated when you save a product or click Save Settings on the settings page.
Calendar popups added for sale and subscription date selectors
When you click these date fields you can either select from the popup calendar or just enter your own date. Note that this is only enabled for WordPress version 3.1 and up because WP 3.0 was using an older version of the jQuery UI core which is incompatible with the newer datepicker scripts. Upgrade people!
Theme file jQuery updates for sub-category wrapping
Sub-categories weren’t always wrapping properly. This was fixed in the foxyshop-single-category.php file on line 65.
Template redirect adjustments for some (wonky) WP installs
As crazy as it sounds, WordPress query vars aren’t that consistent across different installs. There was another variation of query vars for the product and category homepages that are now working properly in the theme redirection file.
Added settings link to WP plugin page
Making it easy to get to the settings page after activation.
Added base name customization option to breadcrumbs function (Products)
If you want to make your breadcrumbs say “Our Amazing Products >> Product 1”, you can now do that. Knock yourself out!
Added February 15, 2018:
To change the “Products” language in the title of the all products page and also in the breadcrumbs, you can copy some of the FoxyShop plugin theme files into your own theme folder to edit. You’ll find these files within the themefiles folder of the FoxyShop plugin.
Specifically, you’ll want to copy the foxyshop-all-products.php file and edit this line to change the title:
echo 'Products
'."\n";
For the breadcrumbs, you’ll copy the foxyshop-single-product.php file to the theme folder and edit this line, changing the “Products” text accordingly:
foxyshop_breadcrumbs(" & raquo; ", "& laquo; Back to Products");
Improved Post Thumbnail Setting Reliability
Sometimes the post thumbnails theme support was being set by the functions.php or another plugin and was keeping them from working. The switch has been moved to the ‘after_setup_theme’ hook and gets turned on more reliably now. Note that post thumbnails are being turned on for ALL post types.
Enjoy, and post here if you run into any troubles with the new features.