Product Variations
If you are a visual learner, here’s an overview of the FoxyShop variations and how they work.
To add a product variation, enter a variation name like “Size”. Next, select the type of variation this should be: a dropdown menu, a single line of text, a free text area, a checkbox, a list of radio boxes, or a custom file upload. You can also select “Description” as a variation although this is just a spot for you to enter some HTML – it doesn’t display any variations to be chosen. Quotes and periods can not be used in variation names. You should also avoid using any reserved terms for other fields like price, weight, name, category, etc. Really anything from this list.
Dropdown/Radio
Each line will be displayed in a drop-down menu or in a list with radio checkboxes. Enter one variation for each line. If you want to change attributes about the product like price or weight, use this example:
Variation Name{p+1.50|w-1|c:product_code|y:shipping_category|dkey:display_key|ikey:image_id}
- P changes the price. You can use + to add to the base price, – to subtract from the base price, or : to just set the price.
- C changes the product code. You can also do c+ to append something to the existing code.
- W changes the product weight.
- Y changes the shipping category.
- DKEY lets you display other fields. More on this in a moment.
- IKEY lets you select a certain image to be displayed when this selection is made. Image ID numbers can be found by holding the mouse over the image in the Image Bar.
- FR changes the subscription frequency. Entering a blank value (fr:) will set disable the subscription frequency. (added in 4.4)
- If you want to set a certain variation be the default, put it first or put a * in the name. The star will be removed before displaying and it will be the default selected option.
Tip: If you are using a drop-down and want to make a price distinction for a downloadable product, use “price:x” instead of “p” to change your price. This will change your price on the page but not in the cart, as this causes some weird reactions with FoxyCart since it will use the price specified with the downloadable product.
Single Line of Text
You can enter your text box size and the maximum number of characters allowed. Neither of these entries is required and if they aren’t entered default values will be used for the width and no maximum will be set.
Multiple Lines of Text
You can choose how many lines of text you want your box to show at once. If nothing is entered, the default will be three. Keep in mind that your users shouldn’t be submitting lots and lots of data as Internet Explorer 7 and 8 have issues accepting over 2047 characters in the address url string.
Checkbox
The checkbox is a mixture between the Dropdown and Single Line of Text but you can enter pricing change data.
Custom File Upload
Due to the previously recommended plugin being discontinued, the previous method is no longer available (shown below). We’ll be updating the plugin to update the Custom File Upload variation type, but you can currently use the following method to create a Custom File Upload variation type.
Configure Uploadcare Widget
- If you don’t already have an Uploadcare account, you can create a free account here.
- If you don’t already have a project, you can create it in Uploadcare here.
Install the Upload File Functionality
- In your WordPress installation’s folders*, go to the /wp-content/themes/your-theme folder and see if either the foxyshop-custom-upload.php or foxyshop-header.php file is in the theme folder. If either is there, it means you may have already customized it, and we’ll need to help you with setting up the file. Here’s our contact page: https://www.foxy.io/contact. If neither file is there, you’re good to go on to the next step.
- Download the two files at these locations:
https://docs.zoho.com/file/dr8r99ee81c77b4e948fa987860c6c2379406
https://docs.zoho.com/file/dr8r97b3a69b68e364b89a7fba9d1e23e3e2d - On the Uploadecare widget configuration page here, set your desired configuration, then copy out the script tags in Steps 3 and 4 of the widget installation. Example (your configuration may be different):
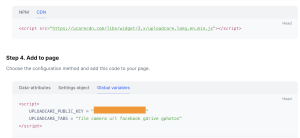
- Open the foxyshop-header.php file that you downloaded and paste in the contents that you copied in the step above on the line after the ?> at the end of the file.
- Copy your Uploadcare public key found by going to your Dashboard->your project->API keys in Uploadcare to your computer’s clipboard.
- Paste the public key you copied between the single quotes for the UPLOADCARE_PUBLIC_KEY value, replacing YOUR_PUBLIC_KEY. Save the file.
- Upload the foxyshop-custom-upload.php and foxyshop-header.php files to your WordPress installation’s themes folder.
Create your Variation
- In WordPress/FoxyShop, go to your product (or create it) where you want to have the Custom File Upload variation.
- Create a new variation and select the Custom File Upload as your variation type.
- Save the product and test.
*If you don’t know what this is, reach out to us here.
Historical information:
Important: If you plan to allow custom file uploads you also need to load this plugin to your WordPress admin.
If this is chosen, the user will be able to upload a file. The file will be given a unique name and placed in the /wp-content/uploads/customuploads/ folder. The filename will be passed along as a product variation during checkout and you can retrieve the file at your convenience. Please note that for security, only the following files types can be uploaded: jpg, gif, jpeg, png, doc, docx, xls, xlsx, pdf, txt, tif, psd. If you need to adjust this list, you can easily set a special variable in your wp-config.php file. See Advanced Settings for instructions on how to do this.
Chainable Variations
It is very simple to set some variations to be dependent on a dropdown menu selection. For this example we have a variation called “Personalization” with two options: “Not Personalized” and “Personalized”. Of course the Personalized option costs $5 more and we want to capture the customer’s personalization text. You would set it up like this:
First Variation: Personalization (dropdown)
No Personalization
Personalization{p+5|dkey:p}
Second Variation: Personalization Text (single line of text)
Enter a Display Key of “p”.
The display key can be any string (so you can have multiple keys). If a value is entered in the Display Key box for a variation, it will be hidden until an option is selected from a dropdown menu that has a “dkey” value that matches it. If you are using multiple ship-to recipients, the dkey for a ship-to recipient other than “Yourself” is “shipto”.
You can add as many variations as you would like and you can even drag them around if you’d like to change the order.
Saved Variations
If you have a complicated variation set, you can save time and simplify the maintenance of your variations by using saved variations. On the FoxyShop tools page you can add as many saved variations as you would like and then select those variations from the dropdown on the product page. If you ever need to make a change to a variation, that change will be applied to all the products at once. Just make sure not to change the reference name or the link to the products will break.